History & Benefits of Bonsai
The word “bon-sai,” though Japanese, is an Eastern art derived from the Chinese word “pun-sai.” For hundreds of years, Japanese culture has emphasized coexistence and peace with nature. Many cultures within Asia have practiced the art of bonsai for roughly 2,000 years as a means to cultivate a more healthy interaction with oneself and nature. This involved taking the wild Japanese landscape and natural scenery and shrinking it down. Interestingly enough, the literal Japanese translation for bonsai is “grown in a shallow pot.” This peculiar nomenclature is derived from the act of growing and maintaining a natural shrub in an unnatural environment to achieve a bonsai tree.
Though they may not have realized it, the early pioneers of bonsai were positively accentuating their spaces on a number of levels. The first, and possibly most important, is the basic chemical contribution of the bonsai. A space with natural foliage functions as somewhat of a filter. Plants absorb unwanted carbon dioxide and odors and produce fresh oxygen with a clean scent. While this effect is taking place, your body responds to the change. Studies performed by NASA show that even common household plants improve concentration and mood while eliminating approximately 87 percent of in-home toxins.
Beyond that, keep in mind the mental relaxation of taking care of something. You must be prepared to take care of your tree. It will rely upon you for its survival, but as you prune and orient your bonsai, watching it grow will truly feel like an investment into something for your own health and personal enjoyment. All of these things considered, there are plenty of ways you can create a bonsai all your own.
Choosing Your Bonsai
Finding the correct species of tree can be a daunting task. Every species offers its own aesthetic, but you must keep in mind the environment of the space where your bonsai will flourish. If you intend to keep your tree indoors, then be sure to choose a plant that will not quickly dry out or wither due to little sunlight. On the other hand, an outdoor tree will need to be adaptable. With Tallahassee’s weather, consider a tree that grows well in sub-tropical environments; although, there are hundreds of varying species to choose from including the following:
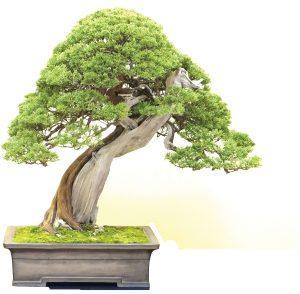
Japanese Juniper (Juniperus Procumbens)
This coniferous beauty adds grace to any setting it is placed within. Its stem grows confidently upward with sprawling pine branches to accent each of its layers. Though they are considered outdoor plants, the Juniper can be easily grown indoors by mimicking some common elements of its environment. Use a gentle, watered down fertilizer, and be sure to keep its branches pruned. By adding gravel, this plant will take the form of its outdoor counterparts while keeping from rooting outwards.
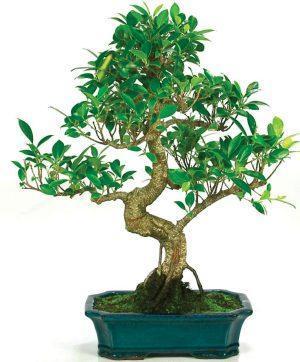
Ficus (Ficus Retusa)
This particular specimen is the most common indoor tree species for beginners in bonsai. If you have ever seen a small bonsai in your doctor’s office, odds are it was this species. These trees are commonly noted by their stunning S-shaped trunk growth. They grow thick, eye-catching branches that grow with a graceful upward swell. The ficus is great for the humid weather of Florida because it consumes water at a staggering rate. The extra moisture will assist in watering it and fertilizer absorption, but remember that this tree will grow large and mossy after a few years.
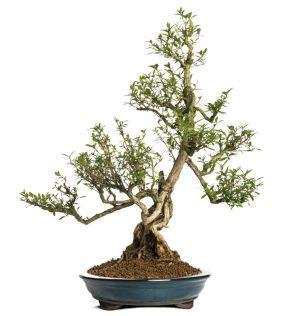
Serissa (Serissa Japonica)
These trees are Japanese natives known to grow raised root systems in very humid, wet environments. Like any other, this tree will require pruning and aligning to gain its iconic upward growth pattern. The serissa requires watering thoroughly and deeply when the soil is completely dry. While planting and orienting, do not worry if the leaves fall off over night. Changes in lighting and temperature cause this, but the leaves will grow back.
Welcoming Your Bonsai
After deciding on the right species, you then need to decide how you would like to acquire your plant. Nursery-bought saplings are a great way to ensure you are picking a plant that has been tended to properly. Typically, these plants have been fertilized and oriented in their grow pots with care. However, if you intend to find a wild species, be sure to take note of its average full-grown size and the current state of the tree; ensure that your choice has strong branches with a stable, healthy stem and root system. Determining this is simple. Look at the trunk’s base, and take note of its roots. Its roots should protrude from the soil only slightly. This means that the tree has reached a mature age in its root development.
After acquiring your bonsai to-be, you must remove it from its native growing pot. With the tree completely removed, use a small tool (a chopstick for example) to remove the hardened dirt from around the bottom of the roots and work up. After the first layer is gone, long, thin roots called “runners” will begin to appear. This is great, but be sure there is still a layer of soil keeping the tree intact. Isolate the dead runners and prune them. A dead runner root can be identified by its spongy texture and lack of tension in its flexibility. Prune these roots to the tip of the soil layer. By doing this, the roots will have space to extend in their new shallow pot.
Repotting Your Bonsai
At this point, your plant will need to be repotted. Before placing your tree, determine the healthiest angle for the base of the tree to sit. The right angle will allow the roots to continue growing without pushing the tree out of its soil. With your planting pot in front of you, place a mound of fresh soil in the bottom of the pot. If you’re afraid the tree will tumble over once in the pot, use thin wire to secure the roots to the base of the pot. Most shallow bonsai pots have small drainage holes in the bottom. Once your roots are organized in the pot, loop your wire through the drainage holes and then around the roots. If you chose a conifer or pine as your bonsai, then you will need a thicker material, such as copper wire. For deciduous species, aluminum wire will work. Wiring your bonsai may seem unnatural, but bear in mind that this is only temporary. Depending on the species of your tree, after a short time of growth, the wiring will be removed, and you won’t have to worry about limp branches as long as the process is performed correctly.
Once your tree is confidently standing in its new home, it’s time to begin working with the individual branches. Begin pruning any dead or dying branches if you have not done so yet. These branches should be cut at an angle down to the shoot. Doing this will allow the branch to heal the wound quickly in order to maintain their clean appearance. Keep in mind what you want your final product to look like.
It’s time to perform the last step – wiring the branches of your bonsai. It is important to note that part of the aesthetic of the bonsai is a natural scene in an unnatural setting, so be sure to leave as little impact on the tree as you can. It is imperative to be careful and gentle with your tree. Holding the trunk steady with one hand, use your dominant hand to spool the wire around the bonsai’s trunk at least twice. At a 45 degree angle, continue upward on the tree until you meet your first branch. Gently begin wrapping the branch with the same piece of wire. Of course, each tree is different, meaning that your branches will require individual care for the best posturing. An important tip for first timers is if you find two branches connected (with one overtop the other), only wire the top stem to keep the tension aimed upwards on the branch. This keeps the stem from growing downward.
Now that your wiring is done, orient your branches in the desired position. This is the moment that all this work has led to. Here is where you will get to see your new bonsai begin to take shape, literally. Don’t worry about slightly going against the tension of the wire, but be careful to not cause too much tension. At this point, damage to a branch is mostly irreversible and will be noticeable. Looking up tutorials or instructions on the best style of your tree is always helpful.
Once you’ve oriented your branches, be sure to check for any areas where unattractive wire shows. The tree should look like it’s been growing in this pot its whole life with no human contact. If you’d like to, feel free to grab small pebbles or gravel and decorate your new potted buddy. Douse the tree with water until the soil is revitalized, and be sure to check for any air pockets. To do this, take a long thin tool (a chopstick will work again) and push it into the dirt. If your tool sinks straight into the soil, gently push the soil down to make it more compact without damaging your tree’s roots.
Loving Your Bonsai
At last, your hard work is done, and you have a healthy, beautiful new bonsai tree to add to your space. Find a spot with the right amount of sunlight and heat for your specific species. If you’ve found yourself escaping the stresses of your everyday life by doing this, thank your new bonsai and continue to nurture it. The longer you do, the longer it will keep you and your space happy and healthy. ![]()
Matthew Jones
Home & Yard Magazine


